Mesh healing is the cornerstone of 3D processing. Without it, your model will be unusable for manufacturing, simulation, or successful visualization. When that happens, MeshInspector has you covered with our Mesh Healing functionality.
What Mesh Healing Does
Mesh healing typically addresses three major issues. We always show them by default: disconnected parts, holes, and self-Intersections.
Disconnected parts These are fragments of the model that are not physically connected to the main geometry. Such segments can interfere with slicing or result in floating debris in the printed output. How does Mesh Healer help? MeshInspector joins large intersecting parts using Boolean Union and removes tiny stray fragments.
Holes. These are gaps or missing polygons that break the surface of a model. They, understandably, compromise watertightness, which is essential for printing and simulations. How does Mesh Healer help? We can fill small holes automatically to ensure model integrity. However, larger ones may need manual bridging. For that, you can also use MeshInspector’s Fill Holes tool.
Self-Intersections. These are geometries that intersect with themselves, creating invalid overlaps. This situation causes slicing and rendering errors, and can break physics simulations. How does Mesh Healer help? Our tool automatically detects and resolves these overlaps by optimizing topology. On top of that, you may also need our Mesh Healer for the following three issues: flipped normals, zero-area triangles, and small tunnels.
Flipped Normals. These are surface normals that point inward instead of outward. E.g they may confuse slicing and physical boundaries. Boiling down to the core, your object may appear inside out. Worse yet, flipped normals interfere with other processing algorithms, including mesh repair itself. That is why our healing tool automatically detects and corrects inconsistent normals, restoring the correct orientation and ensuring that downstream algorithms work as intended.
Zero-Area Triangles (aka Degeneracies). These are triangles with zero surface area due to collapsed points or lines. These can lead to calculation errors in rendering, measurement, and printing. How does Mesh Healer help? MeshInspector identifies and removes or repairs these degenerate elements.
Small Tunnels. These are extremely thin, elongated faces or gaps that can form during modeling. In practice, they are hard to detect visually but may cause slicing artifacts or simulation noise. How does Mesh Healer help? Automatically detects and closes small tunnels to reinforce structural integrity.
How to Use Mesh Healer
Here is what you to heal the mesh:
- Upload it into MeshInspector.
- Go to ‘Mesh Repair.’
- Find ‘Mesh Healer.’
- You will see a dialogue box with control window and two available modes:
- ‘Local Repair,’ which is our default option
- ‘Auto Repair.’
Control window
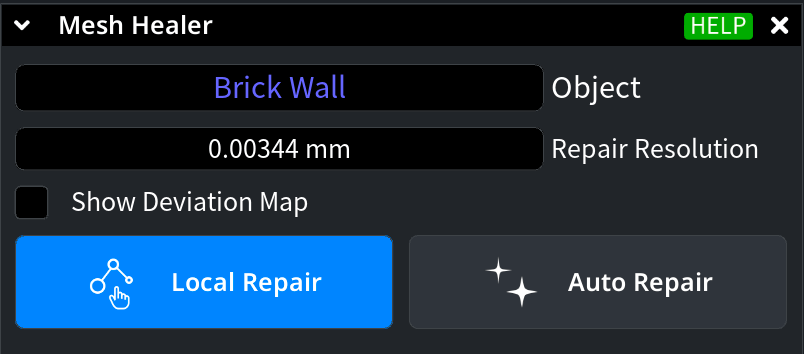
Repair Resolution The Repair Resolution setting functions like a dial for accuracy. This field lets you control how far the repaired mesh can deviate from the original shape.
- Lower values mean more precise repairing
- Higher values will lead to faster processing
By default, Mesh Healer determines the optimal resolution based on the model’s size. Adjusting this setting directly impacts the auto-repair presets, letting you balance between preserving fine details and optimizing computing performance. Lower repair resolutions retain more details but can significantly increase processing time, so adjust carefully according to your available computing resources. When it comes to 3D printing, employ a resolution that is equal to or finer than your printer’s layer height. This parameter is also linked to the Deviation Map, meaning resolution changes influence deviation analysis results.
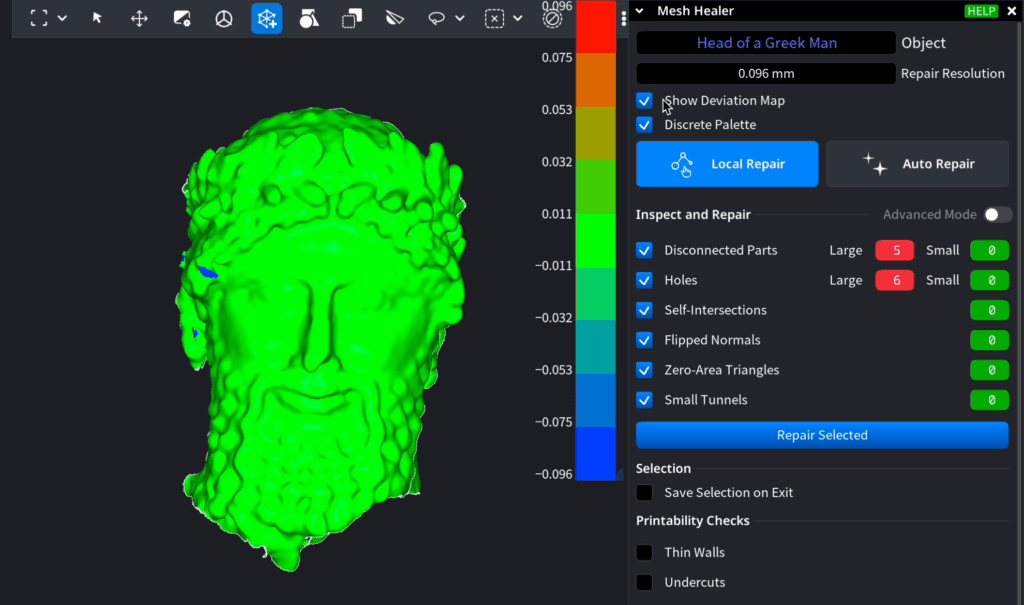 Activate the color map to visualize differences before and after repair by pressing "Show Deviation Map." This feature helps you assess the impact of repairs and make informed decisions.
- Red shows where new geometry was added.
- Blue shows areas that were removed.
Optionally, enable ‘Discrete Palette’ to make the color contrast more distinct.
Local Repair
 This mode focuses on fixing specific problems without affecting the entire structure of your model.
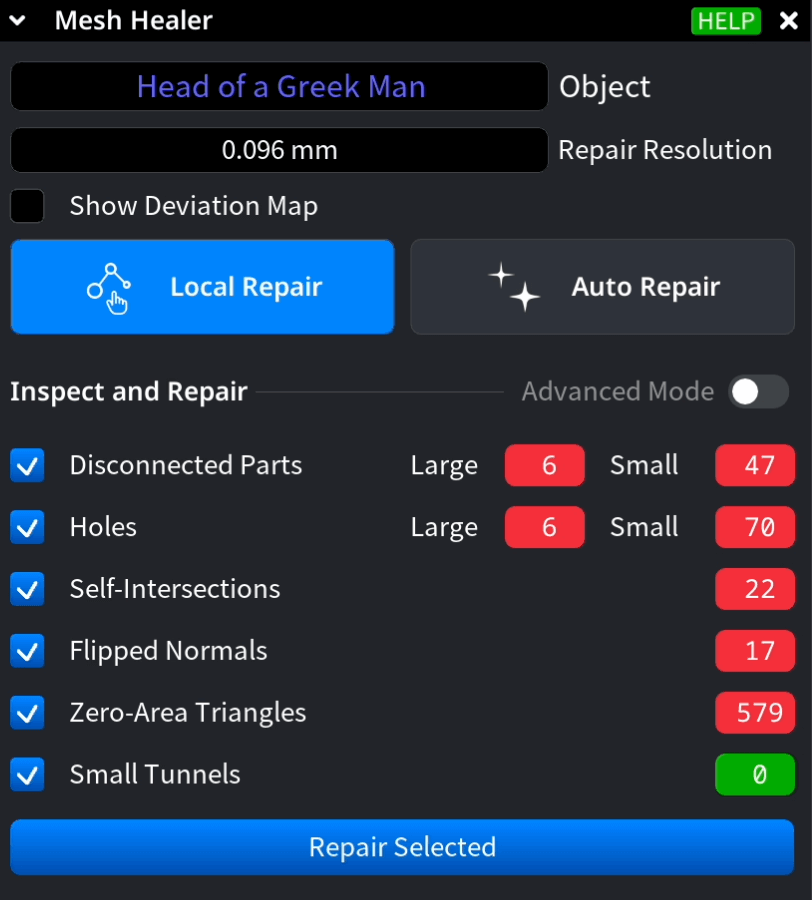
Scanning and identifying issues. Your mesh is automatically scanned for the most common errors:
- Disconnected parts
- Holes
- Self-intersections
You can also toggle checks for:
- Flipped normals
- Zero-Area triangles
- Small tunnels
As soon as you enable these, the interface will show you how many instances were found for each, divided into large and small ones.
Repairing your model. Once you’ve selected the issues you want to fix and set the resolution, click ‘Repair Selected.’ MeshInspector will then process and apply localized corrections based on your selected options.
Reviewing the results. To visualize what changed, toggle ‘Show Deviation Map.’
Checking for printability. If you plan to 3D print the model, you can also enable:
- ‘Thin Walls’ highlight fragile structures that may not print well.
- ‘Undercuts’ flags geometries that could cause problems in injection molding or support removal.
Auto Repair
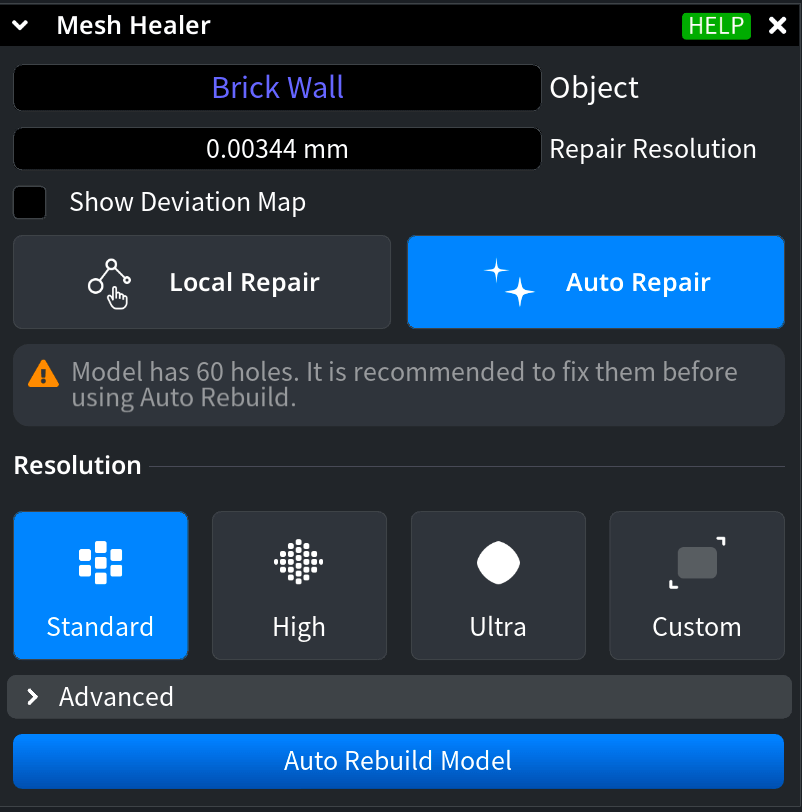
While ‘Local Repair’ focuses on individual issues, ‘Auto Repair' takes a different approach. Namely, it rebuilds the entire model from scratch, creating a clean and printable mesh based on the resolution you opt for.
Preparing the model first. If the mesh you want to heal contains holes, MeshInspector will recommend fixing them before running ‘Auto Repair.’ This is important, do not ignore this warning. If holes remain open, the algorithm may misinterpret geometry and generate unpredictable results.
Choosing a resolution preset. You have four automated resolution options. Each controls the voxel size used for rebuilding:
- ‘Standard’ is the fastest, good for rough or non-critical models
- ‘High’ promises some better detail, but is slightly slower
- ‘Ultra’ means maximum precision. This option is the best one for high-resolution printing or engineering, but computationally heavy
- ‘Custom’ allows you to set your own voxel resolution manually. The lower the number, the better the quality. But it will take longer to compute. Anyway, MeshInspector gives a visual warning when the selected resolution may slow things down or if additional fixes are needed
Running the repair. Once your resolution is selected, click on ‘Auto Repair.’ Mesh Healer will attempt to reconstruct the full surface to the maximum extent possible, closing gaps and resolving other issues. Mesh Healer is your dependable assistant whenever you need to fix issues in your object. It gives you versatile options for any model, so you are equipped to handle virtually any model!