Use Settings to customize MeshInspector for your workflow, from the look of the UI to how navigation and selection behave. Open Settings, under the Home tab, to adjust your UX preferences and work-specific defaults, and revisit it whenever you change devices, input hardware, or the type of models you work with.

1. Quick Settings
Use Quick for fast, everyday adjustments: appearance, shading defaults, background, toolbar visibility, and shortcut lookup (plus basic mouse sensitivity and interaction bindings).
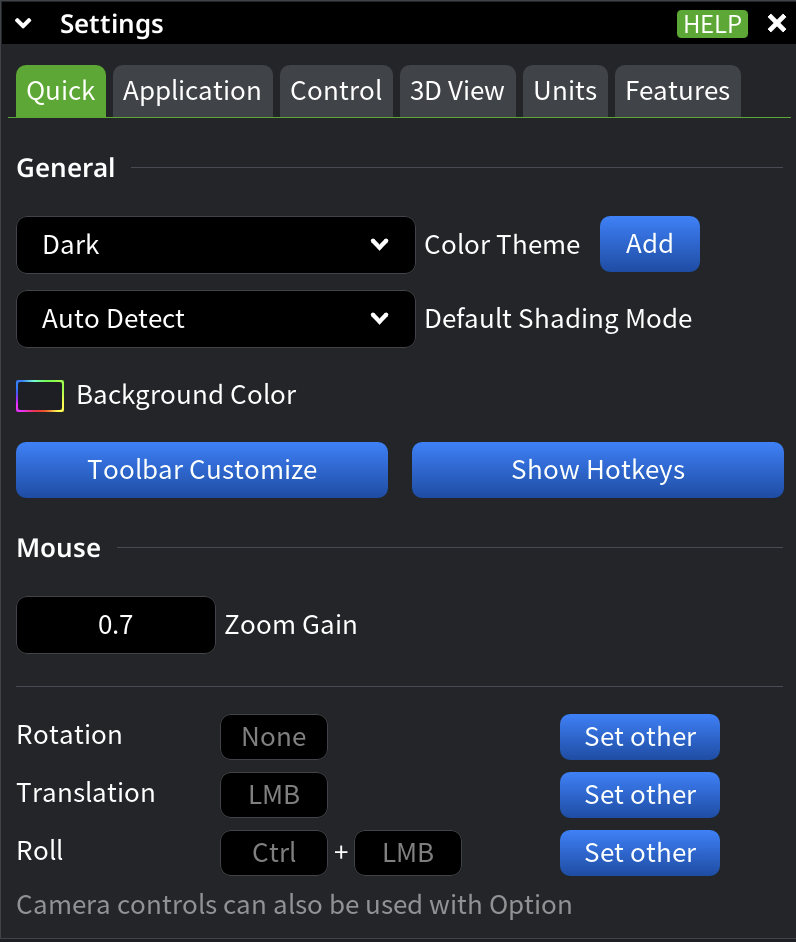
General
- Color Theme switches between the built-in dark and light themes. Use Add to fine-tune a unique theme, then Apply and Save to store it for later use.
- Default Shading Mode sets how meshes are shaded by default:
- Flat shading emphasizes sharp edges, which fits technical and geometric models.
- Smooth shading works better for rounded objects and curved surfaces (for example, organic or artistic shapes).
- Auto Detect (default) automatically picks shading based on the model and is the best match for everyday work. Switch to Flat or Smooth when you need explicit control over how edges and curves are rendered.
- Background Color changes the workspace background. Use it when preparing screenshots or when you need a specific background for visual work.
- Toolbar Customize controls which tools appear in your Toolbar. Check or uncheck tools to keep the toolbar focused on what you use most.
- Show Hotkeys opens the shortcuts menu. Use it to look up available hotkeys and speed up frequent actions.
Mouse
- Zoom Gain controls mouse wheel sensitivity and determines how fast zooming responds to wheel input. Increase it for faster zooming; reduce it for finer control.
- Rotation / Translation / Roll control how mouse input maps to scene navigation. Use these settings to match MeshInspector’s interaction behavior to your preferred workflow.
2. Application Settings
Use Application settings to define how MeshInspector behaves at the application level: interface scaling, persistence between sessions, selection logic, notifications, internal data formats, and default tool behavior. These settings typically change less often than Quick, but they strongly affect long-term comfort and consistency.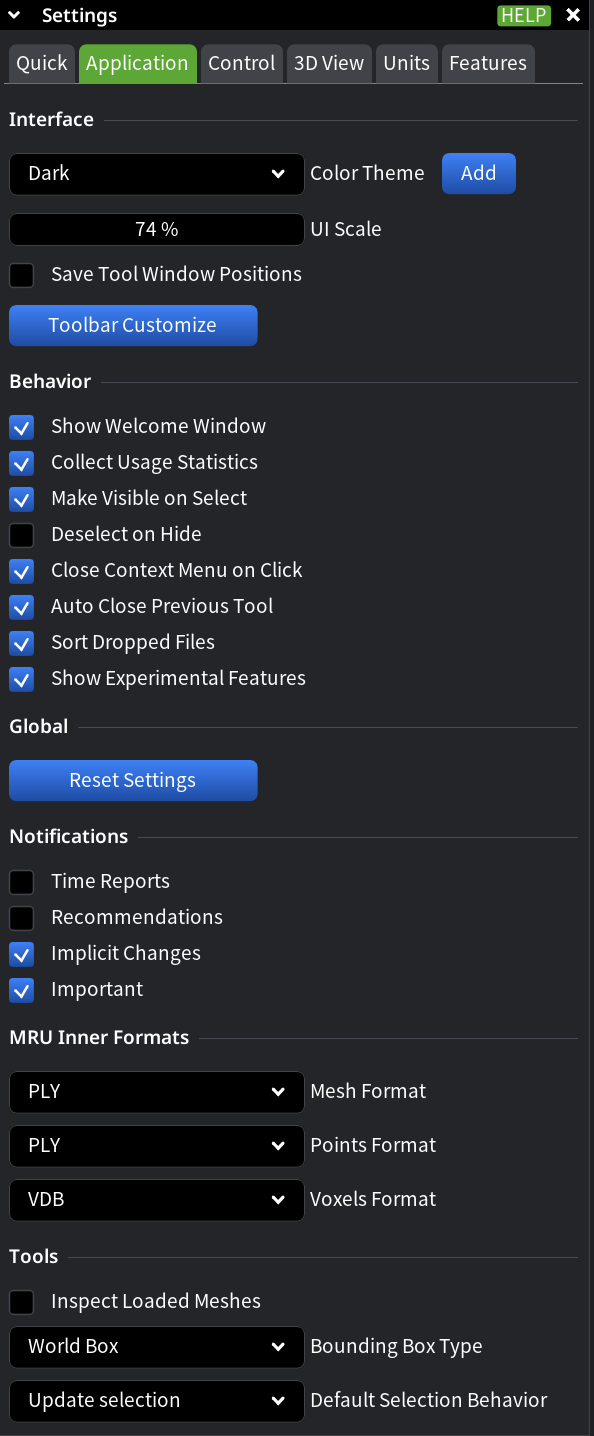
Interface
Use the Interface section to control how the MeshInspector UI looks, scales, and persists between launches.
- Color Theme defines the global application theme. Choose a built-in dark or light theme, or click Add to create, apply, and save a custom theme that persists across sessions.
- UI Scale controls the size of interface elements such as panels, text, icons, and buttons. Increase it for high-DPI or large displays; reduce it to fit more content on screen.
- Save Tool Window Positions preserves the position of tool dialogs between application launches. Enable it if you work with a stable layout and want to avoid rearranging panels every time.
- Toolbar Customize controls which tools are visible in the Toolbar at the application level. Use it to keep frequently used tools accessible and hide rarely used ones.
Behavior
Use the Behavior section to define how MeshInspector reacts to common actions and events.
- Show Welcome Window displays the welcome window on startup. Disable it to launch directly into the workspace.
- Collect Usage Statistics enables anonymous usage data collection.
- Make Visible on Select automatically makes selected objects visible. Use this when working with partially hidden scenes.
- Deselect on Hide removes objects from the selection when they are hidden, preventing accidental edits.
- Close Context Menu on Click automatically closes the context menu after a click or change outside the menu.
- Auto Close Previous Tool closes the currently active blocking tool when another blocking tool is activated. Enable it to avoid manual tool switching.
- Sort Dropped Files automatically sorts files added via drag-and-drop alphabetically by filename before loading them into the scene.
- Show Experimental Features enables access to experimental or diagnostic functionality. Use it when testing or troubleshooting, and disable it for stable production workflows.
Global
- Reset Settings restores all application-level settings to their default values. Use it if configuration changes lead to unexpected behavior or when resetting the environment for a new workflow.
Notifications
Use the Notifications section to control which messages are shown in the lower-left corner of the workspace.
- Time Reports shows how long the last operation took.
- Recommendations displays suggested actions based on context.
- Implicit Changes notifies you about changes applied automatically by the application, for example during import or when handling non-manifold geometry.
- Important highlights critical warnings and error messages.
MRU Inner Formats
Use MRU Inner Formats to define preferred internal formats for objects you work with most often.
Mesh
- CTM prioritizes compression over speed and memory usage. Use it when file size matters more than performance.
- PLY offers a balanced trade-off between speed and file size and is suitable for general use.
- MRMESH provides the fastest loading and saving with no data loss, at the cost of larger file size.
Points
- CTM provides strong compression but slower performance and higher memory usage.
- PLY loads faster with smaller files, suitable for most point cloud workflows.
Voxels
- VDB is optimized for sparse voxel data and is efficient for large grids with empty space.
- RAW stores voxel data without optimization and uses significantly more disk space. It is mainly useful for raw data output or debugging.
Tools
Use the Tools section to control inspection, bounding box visualization, and selection behavior.
- Inspect Loaded Meshes automatically checks newly loaded meshes and suggests using Mesh Healer if geometry issues are detected.
- Bounding Box Type defines how bounding boxes are displayed:
- World Box shows the bounding box in world space.
- Local Box shows the bounding box in local space.
- Dense Box shows a dense bounding box in local space.
- Default Selection Behavior defines how selections are created:
- Update Selection replaces the current selection by default (hold CTRL to append).
- Append Selection adds to the current selection by default (hold CTRL to replace).
3. Control Settings
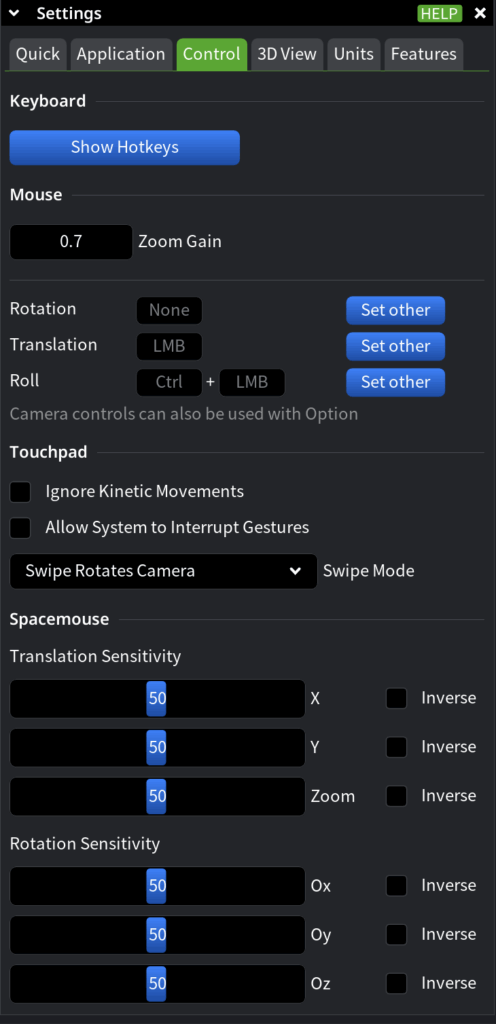
Use MeshInspector’s Control settings to define how input devices interact with MeshInspector. This section focuses on keyboard shortcuts, mouse behavior, touchpad gestures, and 3D input devices. Adjust these settings when you change hardware, want to avoid accidental actions, or need more precise control over navigation.
Keyboard
Use the Keyboard section to review available shortcuts.
- Show Hotkeys opens the hotkeys list. Use it to look up existing shortcuts and learn faster ways to access tools and commands.
Mouse
Use the Mouse section to fine-tune camera navigation and interaction behavior.
- Zoom Gain controls how sensitive zooming is to mouse wheel input. Increase it for faster zooming across large scenes; decrease it for finer, more controlled zoom.
- Rotation, Translation, and Roll define how mouse buttons and modifier keys are mapped to camera controls.
Use Set Other to assign a different mouse button or a button–modifier combination for each action, adapting navigation to your preferred interaction style.
Touchpad
Use the Touchpad section to control gesture handling on touch-enabled devices.
- Ignore Kinetic Movements prevents unintended motion caused by inertial gestures.
- Allow System to Interrupt Gestures lets the operating system take control of gestures when needed, improving overall system responsiveness.
- Swipe Mode defines how swipe gestures are interpreted:
- Rotate the camera
- Move the camera
Choose the mode that best matches how you navigate scenes on a touchpad.
Spacemouse
Use the Spacemouse section to configure 3D navigation devices.
- Translation Sensitivity controls movement speed along the X, Y, and Zoom axes. Use the Inversion checkboxes to reverse individual axes if movement feels unintuitive.
- Rotation Sensitivity controls rotational response around the axes. Axis inversion options allow you to match the device behavior to your expectations.
4. 3D View Settings
Use 3D View settings to control how the scene is displayed, navigated, and rendered. This section defines camera behavior, projection type, visual orientation aids, rendering quality, and shading defaults. Adjust these settings when you need more precise navigation, clearer visual feedback, or better performance–quality balance.

Viewport
Use the Viewport section to define how the scene is navigated and visually oriented.
- Rotation Mode controls how the camera rotates around objects:
- Pick rotates the view around a selected point. Use it when you need to inspect a specific feature or detail.
- Scene Center rotates the view around the center of the scene. Use it for global inspection and overall orientation.
- Pick / Scene Center combines both behaviors and automatically switches based on context.
- Show Axes displays additional axes in the lower-right corner of the workspace. These axes rotate with the object and help maintain orientation during navigation.
- Show Global Basis displays the global coordinate system origin and axes relative to the model.
- Global Basis Scale controls the size of the displayed global axes. Enable Auto to scale them automatically, or set a fixed size manually.
- Projection Mode defines how the 3D scene is projected:
- Orthographic removes perspective distortion and preserves true dimensions. Use it for precise measurements and alignment tasks.
- Perspective simulates depth by scaling objects based on distance. Use it for more natural spatial perception.
- Background Color sets the background color of the viewport. Use it when preparing screenshots or adjusting visual contrast.
- Selected Highlight Modifier adjusts the ambient light multiplier applied to selected objects, making them more or less prominent.
Options
Use the Options section to fine-tune selection behavior and default visualization settings.
- Picker Radius defines the radius, in pixels, used to detect selectable objects under the cursor. Increase it when working with dense scenes or small features.
- Defaults/Shading Mode defines the default shading applied to imported meshes:
- Auto Detect
- Smooth
- Flat
5. Units Settings
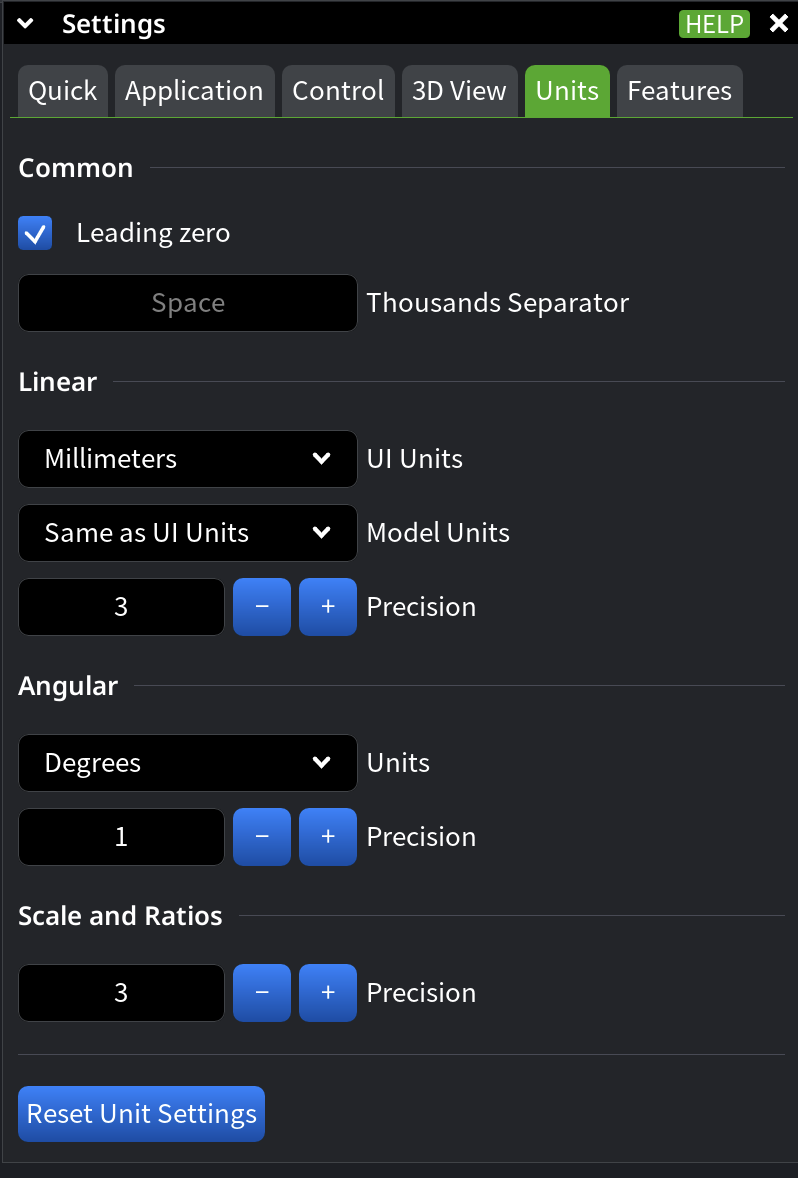
Use Units settings to control how numerical values are displayed and interpreted in MeshInspector. This section affects measurement units, numeric precision, and formatting rules. Adjust these settings when working with different unit systems, preparing measurements for export, or ensuring consistent numeric representation.
Common
Use the Common section to define general numeric formatting rules.
- Leading Zero controls whether a zero is shown before decimal values. Disable it to remove leading zeros in fractional numbers.
- Thousands Separator defines how large numbers are grouped. By default, a space is used as the separator.
Linear
Use the Linear section to define how linear measurements are displayed.
- UI Units sets the unit system used throughout the interface. Available options include microns, millimeters, centimeters, meters, inches, feet, and No Units.
- Precision defines how many digits are shown after the decimal separator for linear values. Increase precision for detailed inspection; reduce it for cleaner numeric output.
Angular
Use the Angular section to define how angular measurements are displayed.
- Unit selects the angular representation format: degrees, degrees–minutes, or degrees–minutes–seconds.
- Precision defines the number of digits shown after the separator for angular values.
Scale and Ratios
Use the Scale and Ratios section to control numeric precision for dimensionless values.
- Precision defines how many digits are displayed after the decimal point for ratios and scale-related measurements.
Reset Unit Settings
- Reset Unit Settings restores all unit-related settings to their default values. Use it if unit configuration changes lead to inconsistent or confusing measurements.
6. Features Settings
Use Features settings to control how visual elements such as surfaces, points, and lines are displayed. This section focuses on appearance and readability rather than interaction or navigation. Adjust these settings when you need clearer visual separation, better visibility of fine details, or a different visual emphasis.
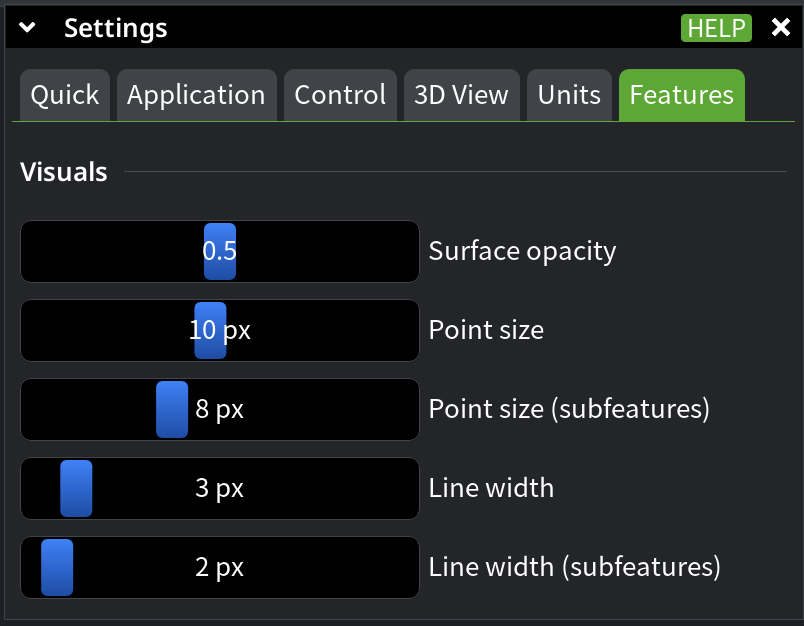
Visuals
Use the Visuals section to customize how geometric elements are rendered.
- Surface Opacity controls the transparency of surfaces. Reduce opacity to see internal structures or overlapping geometry more clearly.
- Point Size defines the size of points in pixels. Increase it to make sparse or small point clouds easier to inspect.
- Point Size for Subfeatures controls the size of points used for subfeatures, allowing them to stand out from primary points.
- Line Width defines the thickness of lines in pixels. Adjust it to improve visibility, especially on high-resolution displays.
- Line Width for Subfeatures controls the thickness of lines used for subfeatures, helping visually distinguish them from main geometry.
Final Notes
Settings in MeshInspector are designed to adapt to different workflows rather than enforce a single way of working. Some options are meant for quick, situational adjustments, while others define long-term defaults that shape how the application behaves across sessions.
Revisit Settings when you change hardware, work with new data types, or notice friction in navigation, selection, or visualization. Most options are safe to experiment with and can be reset individually or globally if needed.
For contextual guidance, use the Help button available in the Settings window to access relevant learning video.