
Convert 3D models from .3MF to .STL (Stereolithography) file format and prepare for printing in one app.


Watch our quick tutorial or read:
Compare 3MF to STL converters and find the best fit for your workflow.
|
MeshInspector
|
MeshInspector
|
Other Converters
|
|
|---|---|---|---|
| Speed |
Ultra-fast Local processing
|
Fast
|
Slow
|
| File Size Limits |
Unlimited
|
Unlimited
|
File size limit (50 MB)
|
| File Number Limits |
Unlimited
|
Unlimited
|
Usually single file only
|
| Folder Support |
Full folder import
|
Full folder import
|
Not supported
|
| Assembly Conversion |
Partial or full assembly
|
Partial or full assembly
|
Not supported
|
| Mesh Validation |
Integrated
|
Integrated
|
Not supported
|
| Auto Mesh Repair |
Advanced
|
Advanced
|
Not supported
|
| Mesh Repair Options |
Advanced
|
Advanced
|
Not supported
|
| Accuracy Control |
Full
|
Full
|
Not supported
|
| 3D Viewer |
Advanced
|
Advanced
|
Basic or no preview
|
| 3D Editor |
Advanced
|
Advanced
|
Not supported
|
| Security & Privacy |
100% Local
|
SSL + Auto-delete
|
Files often stored on servers
|
| Cross-Platform |
Windows, macOS, Linux
|
All devices
|
Web only, limited mobile UX
|
| Suitable for |
Professionals and engineers
|
Quick online conversions
|
Not recommended
|
Join thousands of engineers who trust MeshInspector for their 3D file conversion needs. Start converting today with no limits and professional results.
Powered by MeshInspector technology for reliable file conversion.
MeshInspector offers a quick and dependable way to perform 3MF-to-STL conversions. The workflow is intuitive, fast, and capable of handling even large, multi-part assemblies without quality loss.
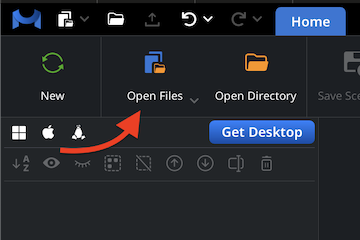
To initiate the conversion from a 3MF file to STL, open MeshInspector. Go to the ’Home’ tab. Click on ‘Open Files.'
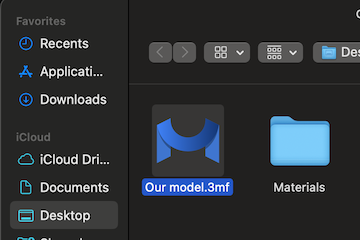
In the service window, navigate to your .3mf model. Select it. Click on ‘Upload’ or double-click to get things done.
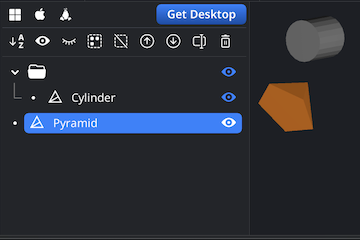
Once imported, your 3MF files get visualized as solid triangular meshes for inspection.
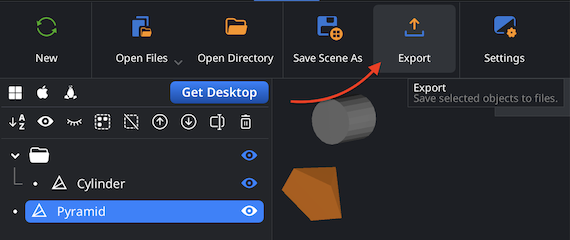
Once your 3MF model is ready-to-go, choose what exactly you are willing to save in the Scene Tree. Right-click it, then employ the ’Export’ functionality. For that purpose, use the ‘Export’ button in the top toolbar to launch the process.
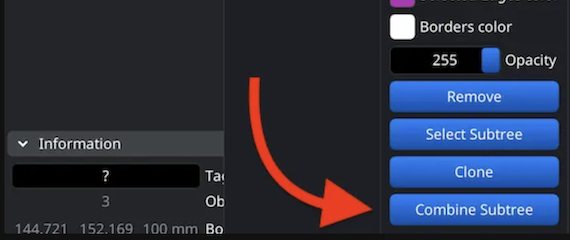
If your .3mf files contain multiple meshes, one can merge them before converting. Select all objects in the Scene Tree. Group them. Then click right on the resulting group and choose ‘Combine Subtree.’
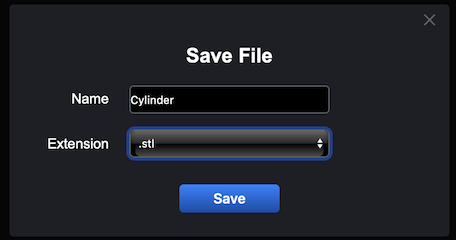
Having pressed ‘Export’ button in the top toolbar, we now see ’Save File’ dialog. Change the name of a model if needed and open the ’Extension’ dropdown list. Here, you are free to pick .stl. After confirming, the program will be quick to perform the conversion from a 3MF file, saving your mesh as a Binary STL file.
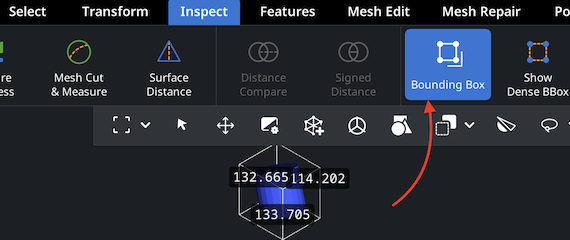
Upload the resulting .stl file. To make sure everything is correct, double-check its physical dimensions. Go to ‘Inspect,’ then click ‘Bounding Box.’ All sizes will be displayed.
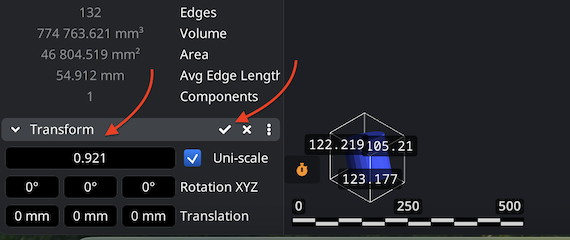
If the scale needs adjustment, use the ‘Transform’ and drag the bar. This will ensure your 3MF to STL conversion results in a correctly sized model. Save the results with the checkbox.
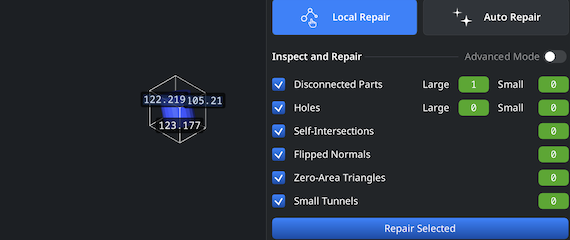
Before finalizing your conversion , it is important to ensure that your mesh is in good qualitative condition. Switch to the ‘Mesh Repair’ tab and open ‘Mesh Healer’ from the top-left corner. This crucial step allows our end-users to detect and automatically fix potential defects. Otherwise, imperfections may cause serious, costly, and time-consuming issues.
With ‘Local Repair,’ you can detect common mesh issues: disconnected parts, holes, self-intersections, flipped normals, zero-area triangles, and small tunnels. You can also enable ’Thin Walls’ and ’Undercuts’ to verify printability. Then click on ‘Repair Selected.’ In addition, you can try ’Auto Repair’ to totally rebuild the model.
100% Secure
No data leaves your device
Works perfectly. Thank you for saving me time today!
I was about to give up on this project because the format was wrong for my machine. dragged it here and boom problem solved. thank you for making this easy.
downloaded a weird file that was crashing my design app. this tool sorted out the mesh so i can actually use it now. much love for the free help
Finally the scale is correct and fits my build plate. Thank you so much for the fix.
Been fighting with my slicer all day trying to open this file but this site fixed the geometry instantly. you guys are legends seriously. big big thanks 🙏