Convert DICOM medical scans (CT, MRI, etc.) into accurate STL 3D models and inspect anatomy with volume rendering and voxel slice views or prepare it for 3D printing.


Watch our quick tutorial or read:
Compare DICOM to STL converters and find the best fit for your workflow.
|
MeshInspector
|
MeshInspector
|
Other Converters
|
|
|---|---|---|---|
| Speed |
Ultra-fast Local processing
|
Fast
|
Slow
|
| File Size Limits |
Unlimited
|
Unlimited
|
File size limit (50 MB)
|
| File Number Limits |
Unlimited
|
Unlimited
|
Usually single file only
|
| Folder Support |
Full folder import
|
Full folder import
|
Not supported
|
| Assembly Conversion |
Partial or full assembly
|
Partial or full assembly
|
Not supported
|
| Mesh Validation |
Integrated
|
Integrated
|
Not supported
|
| Auto Mesh Repair |
Advanced
|
Advanced
|
Not supported
|
| Mesh Repair Options |
Advanced
|
Advanced
|
Not supported
|
| Accuracy Control |
Full
|
Full
|
Not supported
|
| 3D Viewer |
Advanced
|
Advanced
|
Basic or no preview
|
| 3D Editor |
Advanced
|
Advanced
|
Not supported
|
| Security & Privacy |
100% Local
|
SSL + Auto-delete
|
Files often stored on servers
|
| Cross-Platform |
Windows, macOS, Linux
|
All devices
|
Web only, limited mobile UX
|
| Suitable for |
Professionals and engineers
|
Quick online conversions
|
Not recommended
|
Join thousands of engineers who trust MeshInspector for their 3D file conversion needs. Start converting today with no limits and professional results.
Powered by MeshInspector technology for reliable file conversion.
Converting medical imaging data into 3D surface geometry is a critical step in multiple workflows. Specialists who work with volumetric scans, e.g., in dentistry, implant planning, maxillofacial modeling, biomedical engineering, and research, frequently need to export DICOM slices to clean and printable STL files, with all details preserved. In this context, a reliable online or offline tool that provides for precision and gives control over the generation parameters is a must, especially when performing conversion from DICOM file to STL. MeshInspector unlocks this capability.
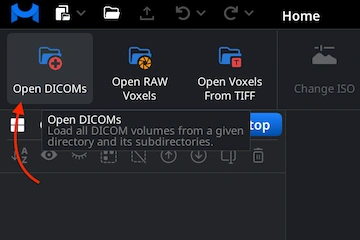
To start the export flow through MeshInspector, click 'Open DICOMs' under the 'CT' (Computed Tomography) tab. This action initiates the process of loading the scan data for your further configuration and potential change.
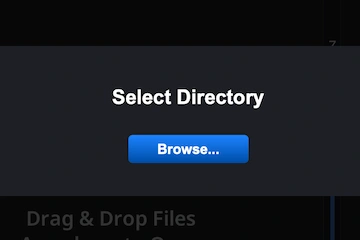
Then, a special modal window appears, prompting you to choose the folder that contains your DICOM series for export to STL. Click ‘Browse’ to open your file system, navigate to the directory with the scan slices.
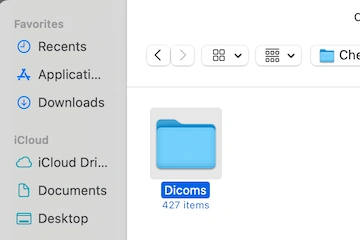
In the selection window, navigate to the folder with your DICOMs. Scans typically include hundreds of files, not a single file. We will handle the entire folder with the slices you want to change. After selecting the folder, click ’Upload.’
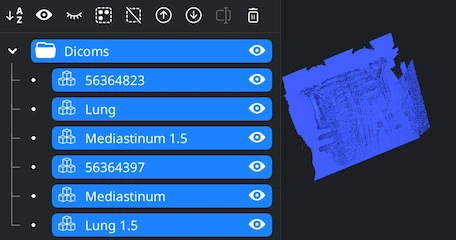
Once the folder is uploaded, MeshInspector displays all detected DICOM series in the Scene Tree. Each series appears as a separate volumetric dataset that you can select by clicking on it or hide using the eye icons. In the Viewport, you will see a raw point cloud representation of the scan. You can navigate the view at any moment. Rotate the view via dragging with the left mouse button or using a one-finger touchpad gesture. Pan it by holding the right mouse button or sliding two fingers on a touchpad. Zoom with the mouse wheel or a pinch gesture. Tilt the view by holding Ctrl while dragging with the left mouse button.
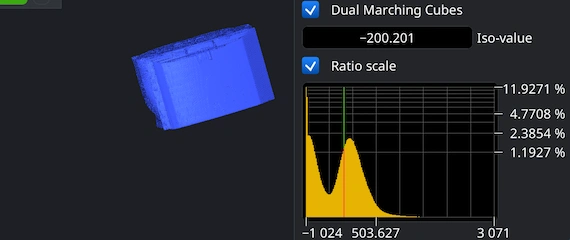
When your TIF represents volumetric data, you can fine-tune which density levels are turned into visible geometry by adjusting the ISO-value. When you click ‘Change ISO,’ under ‘CT’ MeshInspector displays a histogram of voxel intensities. The vertical marker on the histogram corresponds to the current ISO threshold. Click anywhere on the histogram to set a new ISO-value. The 3D preview on the left refreshes in real time. You can also switch between surface extraction algorithms, ‘Dual Marching Cubes’ and ’Standard Marching Cubes.’ Enable ’Ratio scale’ if you want the histogram to be presented regardless of absolute voxel counts.
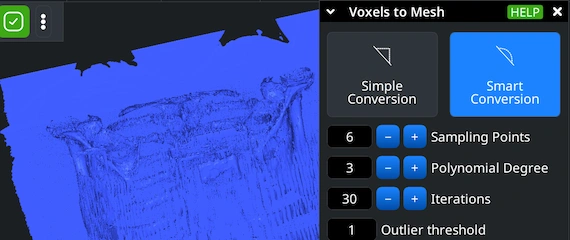
When the ISO-value is set, click ’Voxels to Mesh’ to generate a surface model from the volumetric dataset chosen in MeshInspector’s Scene Tree. We offer ’Simple Conversion,’ which produces quick surfaces and ’Smart Conversion’ which applies extra sampling and smoothing for cleaner and more accurate meshes. In ‘Smart Conversion,’ you can adjust such parameters as Sampling Points, Polynomial Degree, Iterations, Outlier Threshold, and the Preparation and Intermediate Smooth values to control how the surface is reconstructed. In case your priority is to keep the voxel object in the scene for comparison, enable ‘Preserve Voxel Object.’ When all the parameters are configured, click ’Convert.’
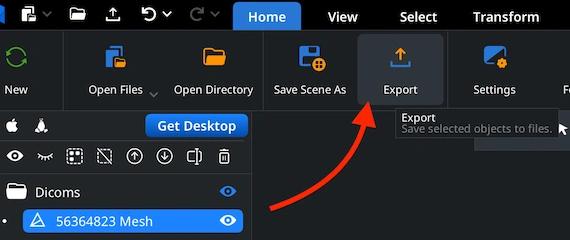
Once the new mesh is generated and selected in the Scene Tree, switch back to MeshInspector’s ’Home’ tab and click ’Export.’
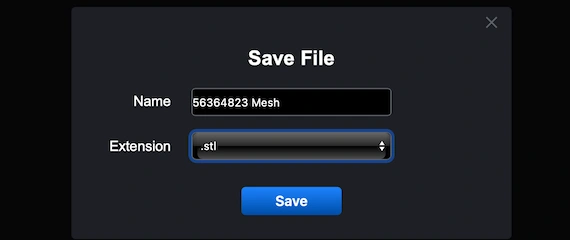
MeshInspector will prompt you to choose the format and location. Select STL to complete the DICOM to STL conversion and save the model as a single file.
100% Secure
No data leaves your device