Convert 3D models from .PLY to .OBJ file format and prepare for printing in one app.


Watch our quick tutorial or read:
Compare PLY to OBJ converters and find the best fit for your workflow.
|
MeshInspector
|
MeshInspector
|
Other Converters
|
|
|---|---|---|---|
| Speed |
Ultra-fast Local processing
|
Fast
|
Slow
|
| File Size Limits |
Unlimited
|
Unlimited
|
File size limit (50 MB)
|
| File Number Limits |
Unlimited
|
Unlimited
|
Usually single file only
|
| Folder Support |
Full folder import
|
Full folder import
|
Not supported
|
| Assembly Conversion |
Partial or full assembly
|
Partial or full assembly
|
Not supported
|
| Mesh Validation |
Integrated
|
Integrated
|
Not supported
|
| Auto Mesh Repair |
Advanced
|
Advanced
|
Not supported
|
| Mesh Repair Options |
Advanced
|
Advanced
|
Not supported
|
| Accuracy Control |
Full
|
Full
|
Not supported
|
| 3D Viewer |
Advanced
|
Advanced
|
Basic or no preview
|
| 3D Editor |
Advanced
|
Advanced
|
Not supported
|
| Security & Privacy |
100% Local
|
SSL + Auto-delete
|
Files often stored on servers
|
| Cross-Platform |
Windows, macOS, Linux
|
All devices
|
Web only, limited mobile UX
|
| Suitable for |
Professionals and engineers
|
Quick online conversions
|
Not recommended
|
Join thousands of engineers who trust MeshInspector for their 3D file conversion needs. Start converting today with no limits and professional results.
Powered by MeshInspector technology for reliable file conversion.
When working across various modeling and visualization tools, MeshInspector can handle all your PLY-to-OBJ conversion tasks. Through MeshInspector, you are free to easily change and export a single PLY file to OBJ while keeping every detail intact. The conversion process is efficient, precise, and suitable even for large or multi-part projects.
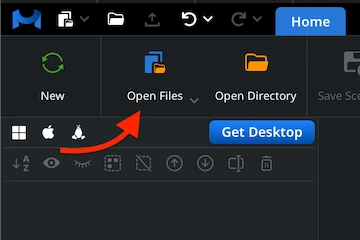
To begin the PLY-to-OBJ conversion, launch MeshInspector. Once the application is running, make sure you are in the ‘Home’ tab to hit ‘Open Files’ to import your model.
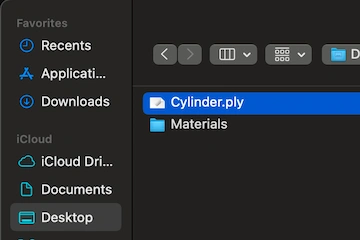
A dialog box will open. Via it, you can locate your .ply file. Browse to the directory where your file is stored, select it, and click ‘Upload’ (or simply double-click) to upload it.
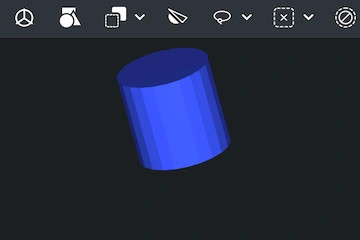
After import, the PLY model will appear as a surface mesh composed of polygons. MeshInspector handles and preserves any essential data contained in PLY files.
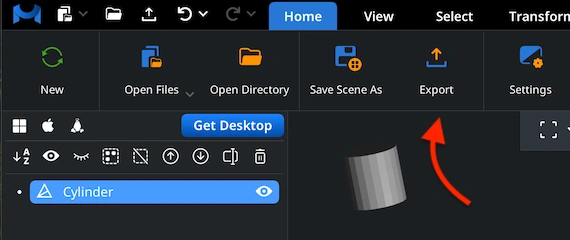
Once your PLY file is loaded, highlight the part you would like to export in the Scene Tree. Press the ‘Export’ icon on the toolbar to bring up the export window and continue the PLY-to-OBJ conversion process.
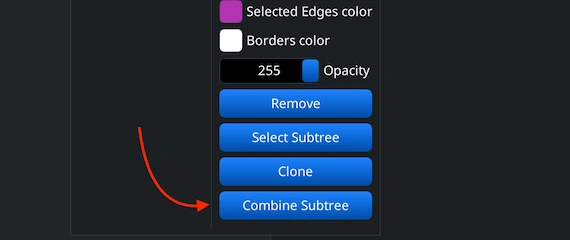
If the PLY file contains multiple sub-meshes, you can consolidate them before saving. In Scene Tree,select the objects of interest. Group them and right-click on the group to choose ‘Combine Subtree’: the outcome is a unified model.
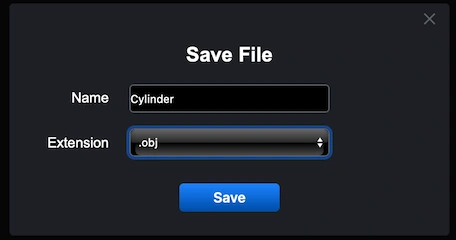
After initiating ‘Export,’ a ‘Save File’ window will pop up. You can rename the file and pick the preferred output type under the ‘Extension’ dropdown. Choose .obj from the list to perform the PLY-to-OBJ conversion. Then, MeshInspector will generate an OBJ, while preserving all precision.
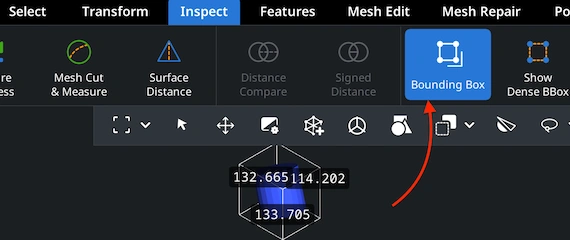
To validate your converted OBJ file, reopen it in MeshInspector. Go to the ‘Inspect’ tab. Select ‘Bounding Box,’ so our advanced and feature-rich program can calculate and display the external dimensions. This will enable you to verify that a proper scale is maintained.
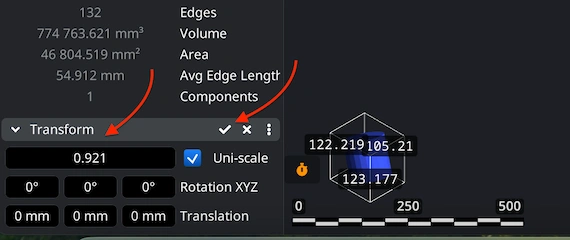
Need to fine-tune the OBJ model’s scale? Head to ‘Transform’ under the ‘Information’ panel. Adjust the scaling slider to enlarge or shrink the mesh. Confirm your changes by clicking the checkbox. The updated size and volume will be appliedimmediately.
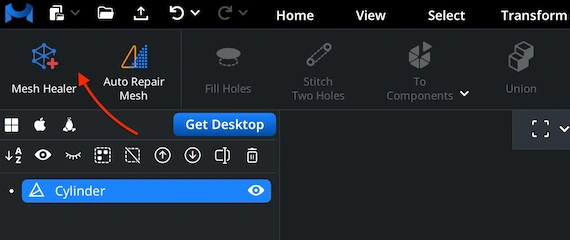
Before completing your conversion, it is highly recommended to assess the mesh integrity. Move to the ‘Mesh Repair’ tab and open ‘Mesh Healer.’ This utility scans the geometry for topological flaws, e.g., as non-manifold edges, inverted normals, or intersecting polygons, and gets the model ready for correction.
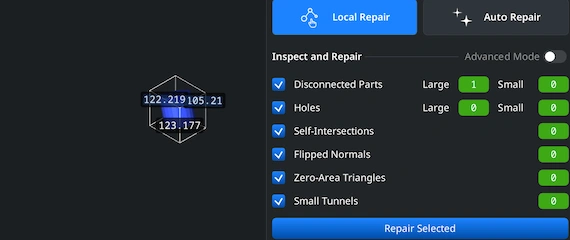
Within ‘Mesh Healer,’ two repair paths are available. 'Local Repair' pinpoints and fixes individual defects, like gaps or misoriented faces. You may also enable ‘Thin Walls’ and ‘Undercuts’ checks to ensure printability. 'Auto Repair' regenerates the entire mesh automatically for a total cleanup.
100% Secure
No data leaves your device
Opened instantly. Good speed.
University computer was crashing on this dataset but browser handled it fine. You saved my thesis deadline seriously. Thank you!!!