Convert single parts or full assemblies from .STEP to .OBJ file format and prepare 3D models for printing in one app.


Watch our quick tutorial or read:
Compare STEP to OBJ converters and find the best fit for your workflow.
|
MeshInspector
|
MeshInspector
|
Other Converters
|
|
|---|---|---|---|
| Speed |
Ultra-fast Local processing
|
Fast
|
Slow
|
| File Size Limits |
Unlimited
|
Unlimited
|
File size limit (50 MB)
|
| File Number Limits |
Unlimited
|
Unlimited
|
Usually single file only
|
| Folder Support |
Full folder import
|
Full folder import
|
Not supported
|
| Assembly Conversion |
Partial or full assembly
|
Partial or full assembly
|
Not supported
|
| Mesh Validation |
Integrated
|
Integrated
|
Not supported
|
| Auto Mesh Repair |
Advanced
|
Advanced
|
Not supported
|
| Mesh Repair Options |
Advanced
|
Advanced
|
Not supported
|
| Accuracy Control |
Full
|
Full
|
Not supported
|
| 3D Viewer |
Advanced
|
Advanced
|
Basic or no preview
|
| 3D Editor |
Advanced
|
Advanced
|
Not supported
|
| Security & Privacy |
100% Local
|
SSL + Auto-delete
|
Files often stored on servers
|
| Cross-Platform |
Windows, macOS, Linux
|
All devices
|
Web only, limited mobile UX
|
| Suitable for |
Professionals and engineers
|
Quick online conversions
|
Not recommended
|
Join thousands of engineers who trust MeshInspector for their 3D file conversion needs. Start converting today with no limits and professional results.
Powered by MeshInspector technology for reliable file conversion.
MeshInspector is a professional-grade platform for working with 3D data. As such, it offers a reliable, efficient, and easy-to-use tool to convert STEP files into OBJ format. This guide explains how to transform your STEP model into a single, ready-to-go OBJ file that can be swiftly prepared for any downstream use.
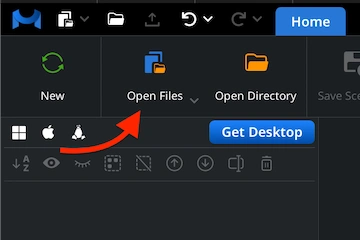
We start by launching the MeshInspector program. When the UI opens, go to the 'Home' tab and select ‘Open Files’. Choose the STEP file that you plan to convert into the OBJ format.
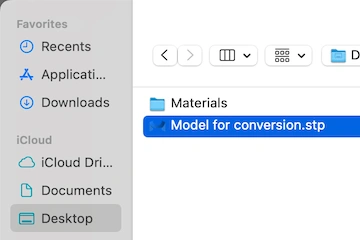
A file selection dialog will appear. Browse to your .step (or .stp) file, highlight it, and confirm the selection by clicking ‘Upload’ or by double-clicking the file name, as usual.
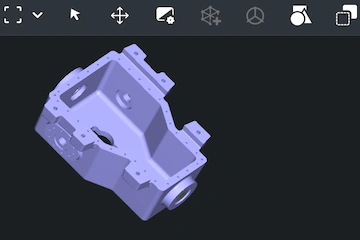
As soon as the file is imported, the STEP model will appear in the main viewport, with every detail retained. The STEP model is now totally ready for your inspection and subsequent export.
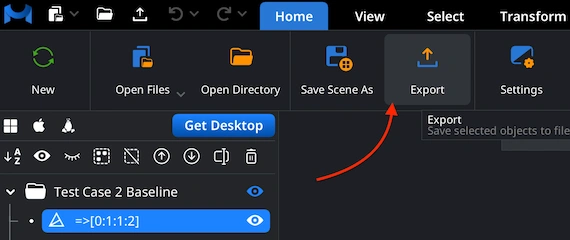
When you can see that your STEP model is ready for conversion, decide exactly which elements you want to include in the export. In the Scene Tree, select the component you wish to change, right-click it, and choose ‘Export’.
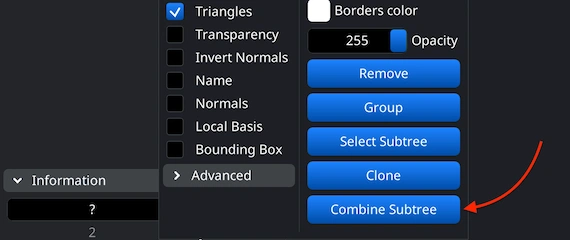
If your file contains several parts, you can merge them into a single object. In the Scene Tree, select all objects, right-click, and choose ‘Group’. Then right-click on the new group and select ‘Combine Subtree’ to unite the components.
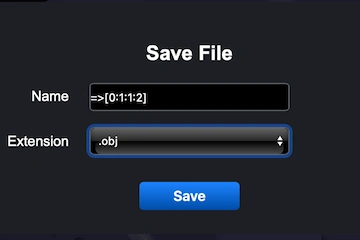
After clicking the ‘Export’ button on the top toolbar, the ‘Save File’ dialog will appear. You can rename your model if necessary, then open the ‘Extension’ dropdown list. Choose .obj as the target format of choice. Once confirmed, MeshInspector will quickly carry out the conversion from your STEP file, generating an OBJ object ready for use.
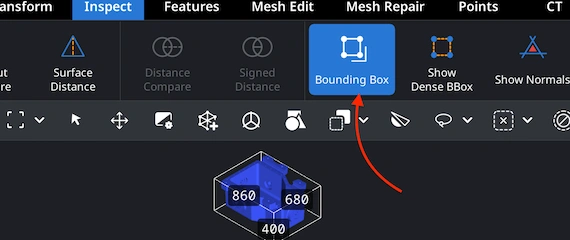
After exporting your .obj file, open it in MeshInspector to verify that the conversion went as expected. Navigate to the ’Inspect’ tab. There, enable ‘Bounding Box.’ This feature displays the model’s full dimensions, allowing one to confirm that the scale and proportions are correct.
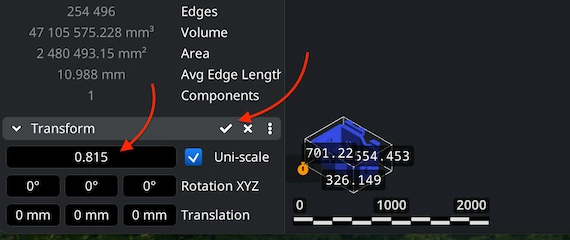
If a model appears unacceptable in terms of its size, go to the ’Transform’ panel and adjust the Scale slider until the size looks right. Once satisfied, apply the change by clicking the checkmark icon. This ensures your STEP-to-OBJ conversion produces relevant proportions and volumes.
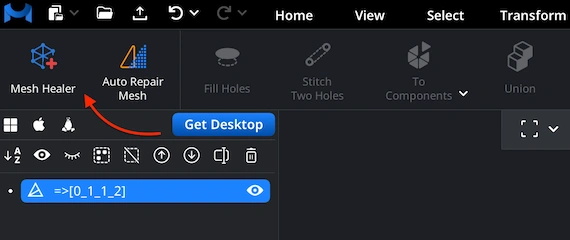
Before completing your STEP-to-OBJ conversion, it is important to make sure the mesh is clean and structurally sound. Go to the ’Mesh Repair’ tab and open ‘Mesh Healer’ from the top-left corner. This tool automatically analyzes the geometry and detects imperfections. It prepares your OBJ for a mesh fixing round. Doing so at this stage helps prevent potential issues that could otherwise lead to errors or wasted time.
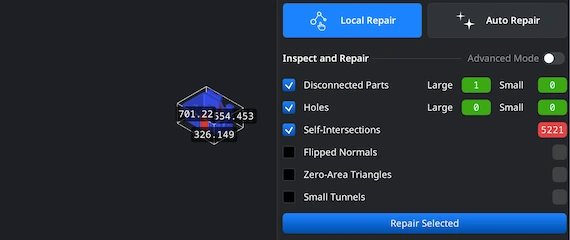
Within the ’Mesh Repair’ tab, ‘Local Repair’ identifies and corrects typical geometry problems such as disconnected parts, holes, self-intersections, flipped normals, zero-area triangles, or small tunnels. For additional validation, enable ‘Thin Walls’ and ‘Undercuts’ to check printability. If the mesh is heavily damaged, you can also use ‘Auto Repair’ to rebuild the model from scratch automatically to ensure a clean OBJ.
100% Secure
No data leaves your device
Parts kept separate. Thank you!
Visuals look crisp. Thanks for the free service.
Marketing needed visuals and this got the CAD data into my rendering app perfectly. Saved me hours of re-modeling. Huge thanks!!