Convert 3D models from .STL to .OBJ file format and prepare for printing in one app.


Read our step-by-step guide:
Compare STL to OBJ converters and find the best fit for your workflow.
|
MeshInspector
|
MeshInspector
|
Other Converters
|
|
|---|---|---|---|
| Speed |
Ultra-fast Local processing
|
Fast
|
Slow
|
| File Size Limits |
Unlimited
|
Unlimited
|
File size limit (50 MB)
|
| File Number Limits |
Unlimited
|
Unlimited
|
Usually single file only
|
| Folder Support |
Full folder import
|
Full folder import
|
Not supported
|
| Assembly Conversion |
Partial or full assembly
|
Partial or full assembly
|
Not supported
|
| Mesh Validation |
Integrated
|
Integrated
|
Not supported
|
| Auto Mesh Repair |
Advanced
|
Advanced
|
Not supported
|
| Mesh Repair Options |
Advanced
|
Advanced
|
Not supported
|
| Accuracy Control |
Full
|
Full
|
Not supported
|
| 3D Viewer |
Advanced
|
Advanced
|
Basic or no preview
|
| 3D Editor |
Advanced
|
Advanced
|
Not supported
|
| Security & Privacy |
100% Local
|
SSL + Auto-delete
|
Files often stored on servers
|
| Cross-Platform |
Windows, macOS, Linux
|
All devices
|
Web only, limited mobile UX
|
| Suitable for |
Professionals and engineers
|
Quick online conversions
|
Not recommended
|
Join thousands of engineers who trust MeshInspector for their 3D file conversion needs. Start converting today with no limits and professional results.
Powered by MeshInspector technology for reliable file conversion.
When preparing 3D objects, the MeshInspector program makes it really easy to convert STL files into OBJs. Export your STL model as a single OBJ file while preserving geometric precision and ensuring the result is ready for any creative or engineering workflow.
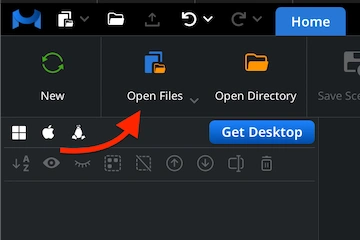
To kick off the conversion from STL to OBJ, launch our program. Once the MeshInspector is open, head over to ‘Open Files,’ the very section shown in the screenshot.
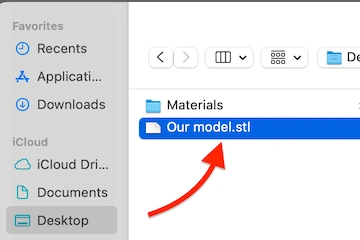
The MeshInspector program will then prompt you to locate the STL file you want to convert. Click on ‘Browse’ to open the directory, navigate to your desired file, and proceed with selection.
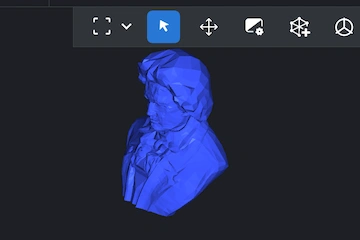
You can now view the source file for conversion. It is fully accessible from any angle, allowing you to prepare it as needed.
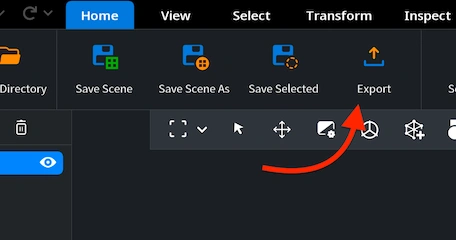
Your next stop is the ‘Export’ button located in the ‘Home’ tab. Once your STL model is selected in MeshInspector’s scene tree, go ahead and click the button.
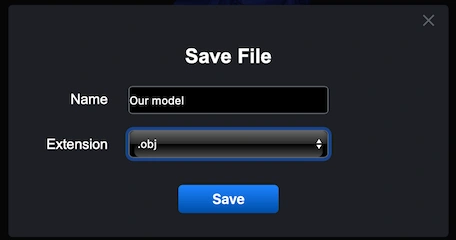
After selecting ’Export,’ open the drop-down list of available formats. Then, choose OBJ. You can also rename your object if needed. Finally, click ’Save’ to complete the process.
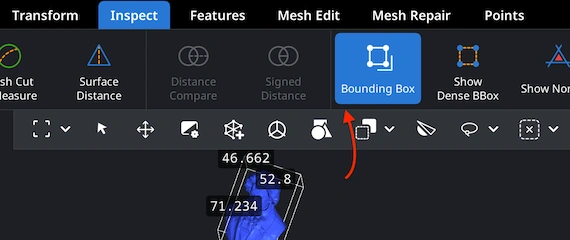
With your OBJ uploaded, you can start by inspecting its size. While OBJ files are capable of storing additional data such as colors and texture coordinates, this specific model contains none. Go to ‘Inspect.’ In that tab, click on ‘Bounding Box.’ All dimensions will be shown.
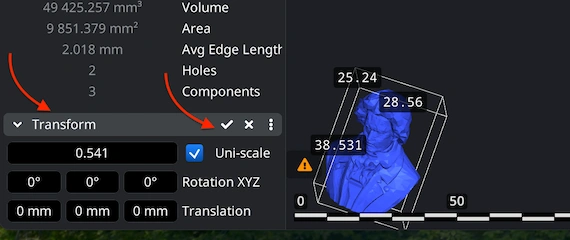
Here, your option is ‘Transform,’ under ‘Information’ in the scene tree. Use the scaling bar by dragging it. Make sure to apply the changes by clicking on the checkmark. Both the dimensions and volume of your model will change once you finalize.
100% Secure
No data leaves your device
just what i needed.
my animation app hates print files so i needed to swap formats. this did it without messing up the normals.
super useful 💖
now i can paint on this model.