
Convert single parts or full assemblies from .STP to .OBJ file format and prepare 3D models for printing in one app.


Watch our quick tutorial or read:
Compare STP to OBJ converters and find the best fit for your workflow.
|
MeshInspector
|
MeshInspector
|
Other Converters
|
|
|---|---|---|---|
| Speed |
Ultra-fast Local processing
|
Fast
|
Slow
|
| File Size Limits |
Unlimited
|
Unlimited
|
File size limit (50 MB)
|
| File Number Limits |
Unlimited
|
Unlimited
|
Usually single file only
|
| Folder Support |
Full folder import
|
Full folder import
|
Not supported
|
| Assembly Conversion |
Partial or full assembly
|
Partial or full assembly
|
Not supported
|
| Mesh Validation |
Integrated
|
Integrated
|
Not supported
|
| Auto Mesh Repair |
Advanced
|
Advanced
|
Not supported
|
| Mesh Repair Options |
Advanced
|
Advanced
|
Not supported
|
| Accuracy Control |
Full
|
Full
|
Not supported
|
| 3D Viewer |
Advanced
|
Advanced
|
Basic or no preview
|
| 3D Editor |
Advanced
|
Advanced
|
Not supported
|
| Security & Privacy |
100% Local
|
SSL + Auto-delete
|
Files often stored on servers
|
| Cross-Platform |
Windows, macOS, Linux
|
All devices
|
Web only, limited mobile UX
|
| Suitable for |
Professionals and engineers
|
Quick online conversions
|
Not recommended
|
Join thousands of engineers who trust MeshInspector for their 3D file conversion needs. Start converting today with no limits and professional results.
Powered by MeshInspector technology for reliable file conversion.
MeshInspector is a professional program built for precise 3D data operations. It provides an efficient, dependable, and intuitive way to convert STP files into OBJ format while keeping the geometry intact. This walkthrough shows how to turn an STP model into a single OBJ file, clean and perfectly suitable for any downstream use.
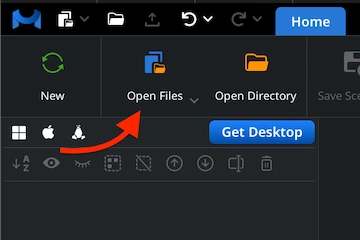
Begin by launching MeshInspector. Once the interface loads, open the ‘Home’ tab and click ‘Open Files’. From there, you can select the STP file you would like to convert to OBJ.
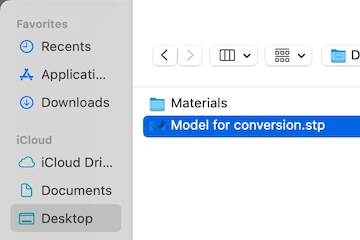
A file browser dialog will open. Locate your .stp file, select it, and confirm by clicking ‘Upload’ or double-clicking its name. MeshInspector will quickly import the geometry and display it.
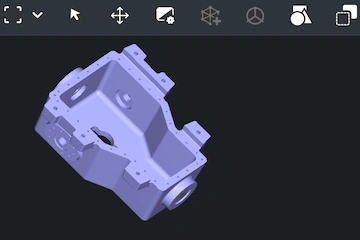
Once loaded, your STP model appears in the viewport. All original geometric details are preserved, so you can freely inspect and prepare the model before conversion.
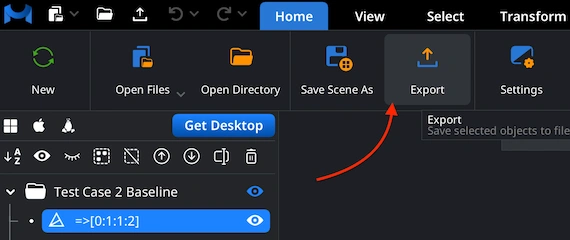
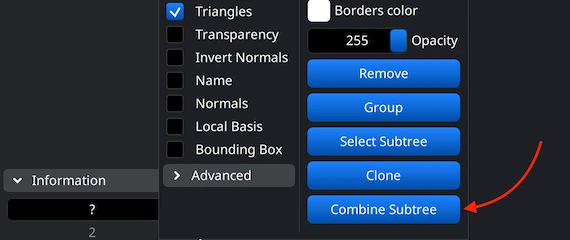
When your STP model is ready, decide which elements you want to export through MeshInspector. In the Scene Tree, right-click the desired component, then click the ‘Export’ button in the same ‘Home’ tab.
If your STP includes several parts, you can merge them for export. In the Scene Tree, highlight the components, right-click, and select ‘Group’. Then, right-click that group and choose ‘Combine Subtree’ to fuse the parts into a single unified file.
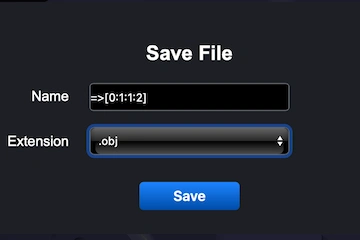
After clicking ‘Export’ on the top toolbar, the ‘Save File’ dialog appears. Rename the model if needed, open the ‘Extension’ dropdown, and choose .obj as your target format. Once confirmed, MeshInspector performs the conversion, generating an OBJ file for further editing or use in other applications.
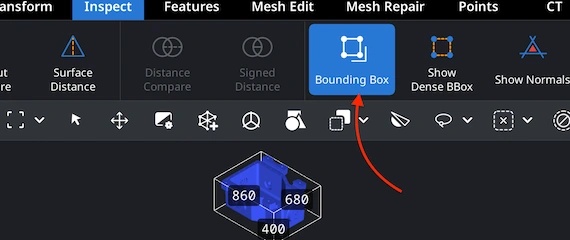
After successful export, open your new .obj file in MeshInspector to confirm everything looks right. Navigate to the ‘Inspect’ tab and enable ‘Bounding Box’ to display the full dimensions of your model. This step ensures your STP-to-OBJ conversion generated the needed scale and proportions.
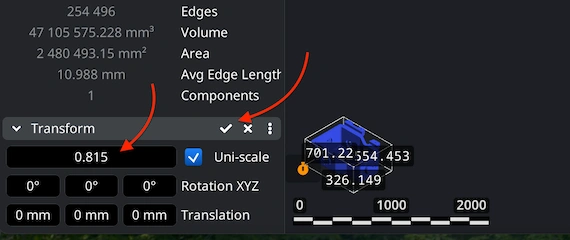
If the object appears undersized or oversized, go to the ’Transform’ panel and fine-tune the Scale slider until the proportions are correct. When satisfied, apply the changes by clicking the checkmark icon. This guarantees that your converted OBJ matches the required project-specific dimensions.
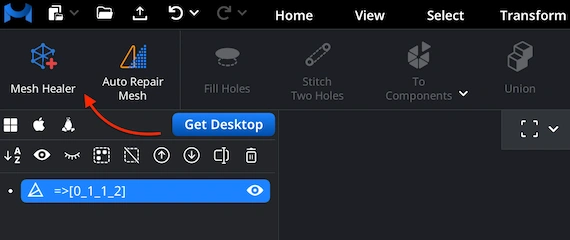
Before finalizing your STP-to-OBJ conversion, it is normally recommended to verify mesh quality. Open the ’Mesh Repair’ tab and launch ‘Mesh Healer’ from the top-left corner. This utility in MeshInspector analyzes the geometry for structural errors or gaps and prepares the OBJ for a quick repair round. Running this step helps prevent issues that could lead to future export or print problems.
Within the ’Mesh Repair’ tab, the ‘Local Repair’ feature identifies and fixes common mesh problems, e.g., disconnected surfaces, holes, inverted normals, self-intersections, or zero-area triangles. For further verification, enable ‘Thin Walls’ and ‘Undercuts’ to check print readiness. If the model contains severe defects, use ‘Auto Repair’ to rebuild the entire OBJ.
100% Secure
No data leaves your device
smooth curves. thank you.
Render came out nice. Thanks a lot.