Convert GLTF models to PLY files while preserving colors, vertices, and structure.


Watch our quick tutorial or read:
Compare GLTF to PLY converters and find the best fit for your workflow.
|
MeshInspector
|
MeshInspector
|
Other Converters
|
|
|---|---|---|---|
| Speed |
Ultra-fast Local processing
|
Fast
|
Slow
|
| File Size Limits |
Unlimited
|
Unlimited
|
File size limit (50 MB)
|
| File Number Limits |
Unlimited
|
Unlimited
|
Usually single file only
|
| Folder Support |
Full folder import
|
Full folder import
|
Not supported
|
| Assembly Conversion |
Partial or full assembly
|
Partial or full assembly
|
Not supported
|
| Mesh Validation |
Integrated
|
Integrated
|
Not supported
|
| Auto Mesh Repair |
Advanced
|
Advanced
|
Not supported
|
| Mesh Repair Options |
Advanced
|
Advanced
|
Not supported
|
| Accuracy Control |
Full
|
Full
|
Not supported
|
| 3D Viewer |
Advanced
|
Advanced
|
Basic or no preview
|
| 3D Editor |
Advanced
|
Advanced
|
Not supported
|
| Security & Privacy |
100% Local
|
SSL + Auto-delete
|
Files often stored on servers
|
| Cross-Platform |
Windows, macOS, Linux
|
All devices
|
Web only, limited mobile UX
|
| Suitable for |
Professionals and engineers
|
Quick online conversions
|
Not recommended
|
Join thousands of engineers who trust MeshInspector for their 3D file conversion needs. Start converting today with no limits and professional results.
Powered by MeshInspector technology for reliable file conversion.
MeshInspector is a full-fledged solution for 3D data professionals. As such, it helps those who need to convert GLTF models into PLY files for printing or further editing. This detailed guide will take you, in a step-by-step fashion, through the process of transforming your GLTF scene into a clean, single, and production-ready PLY file, all through MeshInspector’s intuitive workspace and efficient export tools.
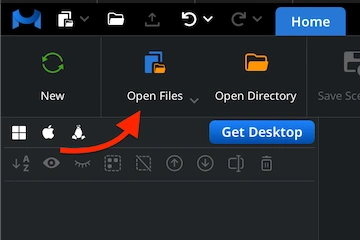
Begin your GLTF-to-PLY conversion. To do so, launch the MeshInspector program. When the workspace opens, go to the ’Home’ tab and select ’Open Files.’ Choose the GLTF file you wish to convert.
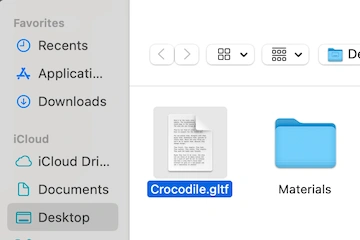
A file selection dialog will appear. It will allow you to locate your GLTF model. Files of this sort may look a bit different. This is because they are built in JSON format. Click ’Browse,’ pick your file, and confirm the choice.
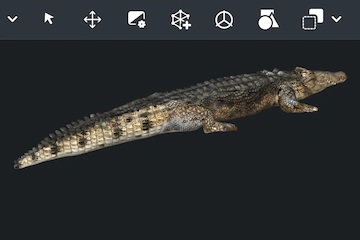
Once loaded, your GLTF model will appear in the main viewport with all textures and materials displayed. The object will be rendered with proper lighting, similar to the crocodile model shown in this guide.
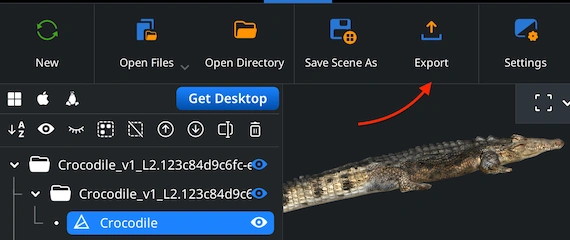
To continue the GLTF-to-PLY conversion workflow, locate your model of choice in the ’Scene Tree.’ Right-click on it and choose ’Export’ from the available alternatives. This step opens the export dialog. Right there, you will define the format and name of the eventual file.
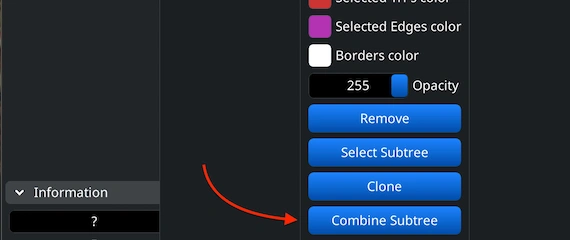
If your GLTF scene contains several separate elements, merge them before exporting. In ’Scene Tree,’ select all relevant parts, right-click, and choose ’Group.’ Then right-click the new group and select ’Combine Subtree.’ This action will join all elements into a single subtree.
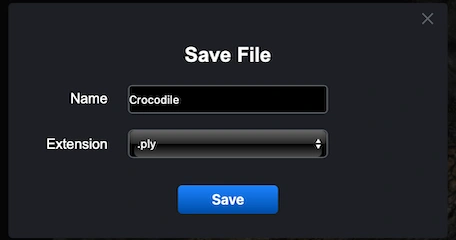
After clicking ’Export,’ a ’Save File’ dialog will appear. You can rename your file if needed and open the ’Extension’ dropdown to pick the correct output format. Choose .ply from the list, then press ’Save.’ MeshInspector will generate a single PLY file from your GLTF model.
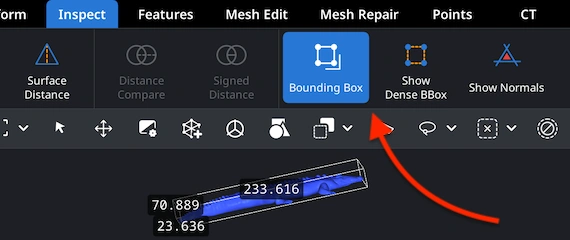
Once the export is complete, it is a good idea to make sure your model has kept the correct proportions. Open the newly generated .ply file and switch to the ’Inspect’ tab. Then select ’Bounding Box.’ This tool shows your object’s actual dimensions and limits, making it possible for you to confirm that its scale and dimensions are accurate enough.
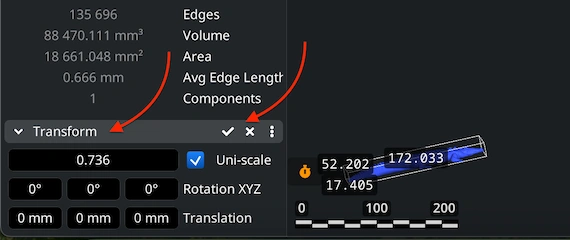
If the model ends up being too large or small after inspection, your next step is to use the ’Transform’ panel. Use the Scale control bar to resize the object until the proportions look correct. Once satisfied, apply the changes to confirm the adjustment. This step ensures that your PLY file will align perfectly with upcoming 3D modeling and/or printing tasks.
100% Secure
No data leaves your device
data extracted thx