


Convert .CSV datasets into .ASC point cloud files, reinterpret rows as XYZ coordinates, and output clean survey-ready data in one app.


Watch our quick tutorial or read:
Compare CSV to ASC converters and find the best fit for your workflow.
|
MeshInspector
|
MeshInspector
|
Other Converters
|
|
|---|---|---|---|
| Speed |
Ultra-fast Local processing
|
Fast
|
Slow
|
| File Size Limits |
Unlimited
|
Unlimited
|
File size limit (50 MB)
|
| File Number Limits |
Unlimited
|
Unlimited
|
Usually single file only
|
| Folder Support |
Full folder import
|
Full folder import
|
Not supported
|
| Assembly Conversion |
Partial or full assembly
|
Partial or full assembly
|
Not supported
|
| Mesh Validation |
Integrated
|
Integrated
|
Not supported
|
| Auto Mesh Repair |
Advanced
|
Advanced
|
Not supported
|
| Mesh Repair Options |
Advanced
|
Advanced
|
Not supported
|
| Accuracy Control |
Full
|
Full
|
Not supported
|
| 3D Viewer |
Advanced
|
Advanced
|
Basic or no preview
|
| 3D Editor |
Advanced
|
Advanced
|
Not supported
|
| Security & Privacy |
100% Local
|
SSL + Auto-delete
|
Files often stored on servers
|
| Cross-Platform |
Windows, macOS, Linux
|
All devices
|
Web only, limited mobile UX
|
| Suitable for |
Professionals and engineers
|
Quick online conversions
|
Not recommended
|
Join thousands of engineers who trust MeshInspector for their 3D file conversion needs. Start converting today with no limits and professional results.
Powered by MeshInspector technology for reliable file conversion.
When working with 3D datasets, users often need to change point-based geometry from one format to another to ensure compatibility with modeling tools, GIS systems, or simulation software. This is where the conversion from CSV file to ASC becomes essential. Although both formats store point clouds, CSV files normally contain inconsistent delimiters, mixed headers, unordered coordinate columns, etc. ASC files, on the other hand, offer cleaner and more standardized structures that enable predictable parsing and easier interoperability across tools.
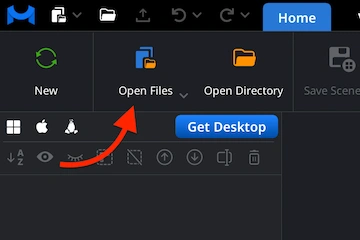
Start by launching the MeshInspector program. Under the ‘Home’ tab, all import actions begin. To prepare for the conversion from CSV file to ASC, click ‘Open Files.’
The MeshInspector program for 3D data handling will display a small dialog titled ’Select Files.’ Click ’Browse’ button to open your file picker and locate your dataset.
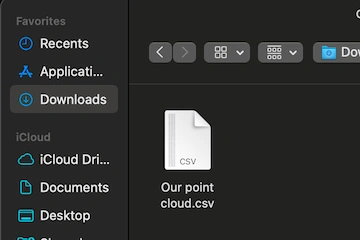
Navigate to the folder with your dataset. Select the CSV file. You can double-click the file to confirm your selection or click the ‘Upload’ button once the file is highlighted.
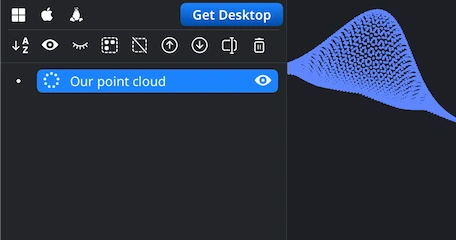
Once the CSV file is uploaded, your point cloud appears in the viewport. It is also listed in our ‘Scene Tree.’ You can explore it using standard navigation controls, e.g., rotate the view by dragging with the left mouse button or using a one-finger touchpad gesture. Panning is available through holding the right mouse button or sliding two fingers. Zoom with the mouse wheel or a pinch gesture. Finally, tilt the perspective by holding Ctrl while dragging with the left mouse button.
With your point cloud selected in the ‘Scene Tree,’ go to the ‘Home’ tab and click ‘Export.’ This command allows you to convert the loaded dataset into another supported format, which includes the ASC format required for this workflow.
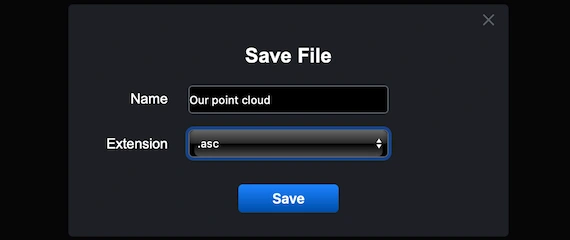
After clicking ‘Export,’ MeshInspector opens a ’Save File’ dialog. Enter a name for your output, then open the’Extension’ dropdown and select .asc from the list of available formats. When everything is set, click ’Save’ to complete the conversion.
Load the ASC file back into the MeshInspector program for 3D data to verify that the dataset has been preserved in a proper fashion. Check that your point clouds appear in our Viewport as coherent 3D structures. Rotate, pan, and zoom ACSs using the navigation controls described above to ensure the geometry behaves naturally and that no axes were unintentionally swapped. The cloud should not appear stretched or oriented in an unexpected direction.
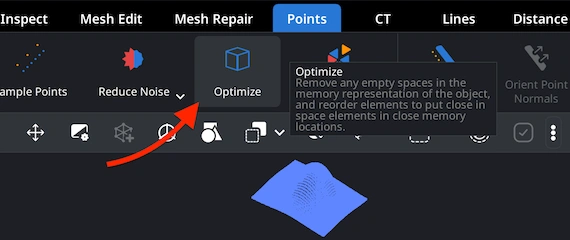
With your ASC selected in our ‘Scene Tree,’ switch to the ’Points’ tab to access tools for point-based datasets. Locate the’Optimize’ button to click it. This step will remove empty gaps in the memory layout of the point cloud and reorder elements. Thus, spatially close points will be stored in nearby memory locations. While it does not modify the visual structure of the dataset, it helps improve efficiency and prepares the ASC file for smoother processing in downstream workflows.
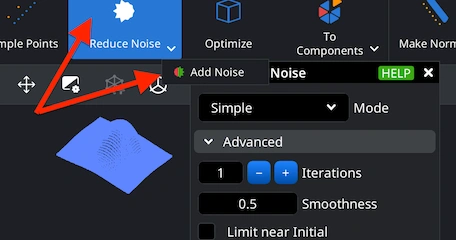
Under the ‘Points’ tab, MeshInspector provides tools for adding and reducing noise in your datasets. For that, click 'Reduce Noise.' Alternatively, you can use the small arrow, located next to it, to select 'Add Noise.' This will opens the dedicated panel. Inside it, you are free to adjust parameters, including mode, iterations, and smoothness to control how noise is applied to the point cloud. When you are ready to commit the changes, click 'Apply' to finalize the operation.
100% Secure
No data leaves your device